一.概述 AMS为主线,讲述system_server进程中AMS服务的启动过程,以startBootstrapServices()方法为起点,紧跟着startCoreServices(), startOtherServices()共3个方法。
二.AMS启动过程 2.1 startBootstrapServices
1
2
3
4
5
6
7
8
9
10
11
12
13
14
15
16
17
private void startBootstrapServices() { ... //启动AMS服务【见小节2.2】 mActivityManagerService = mSystemServiceManager.startService( ActivityManagerService.Lifecycle.class).getService(); //设置AMS的系统服务管理器 mActivityManagerService.setSystemServiceManager(mSystemServiceManager); //设置AMS的APP安装器 mActivityManagerService.setInstaller(installer); //初始化AMS相关的PMS mActivityManagerService.initPowerManagement(); ... //设置SystemServer【见小节2.3】 mActivityManagerService.setSystemProcess(); }
2.2 启动AMS服务
2.1.1 AMS.Lifecycle
1
2
3
4
5
6
7
8
9
10
11
12
13
14
15
16
17
18
public static final class Lifecycle extends SystemService { private final ActivityManagerService mService; public Lifecycle(Context context) { super(context); //创建ActivityManagerService【见小节2.1.2】 mService = new ActivityManagerService(context); } @Override public void onStart() { mService.start(); //【见小节2.1.3】 } public ActivityManagerService getService() { return mService; } }
该过程:创建AMS内部类的Lifecycle,已经创建AMS对象,并调用AMS.start();
1
2
3
4
5
6
7
8
9
10
11
12
13
14
15
16
17
18
19
20
21
22
23
24
25
26
27
28
29
30
31
32
33
34
35
36
37
38
39
40
41
42
43
44
45
46
47
48
49
50
51
52
53
54
55
56
57
58
59
60
61
62
63
64
65
66
67
68
69
70
71
72
73
74
75
76
77
78
79
80
public ActivityManagerService(Context systemContext) { mContext = systemContext; mFactoryTest = FactoryTest.getMode();//默认为FACTORY_TEST_OFF mSystemThread = ActivityThread.currentActivityThread(); //创建名为"ActivityManager"的前台线程,并获取mHandler mHandlerThread = new ServiceThread(TAG, android.os.Process.THREAD_PRIORITY_FOREGROUND, false); mHandlerThread.start(); mHandler = new MainHandler(mHandlerThread.getLooper()); //通过UiThread类,创建名为"android.ui"的线程 mUiHandler = new UiHandler(); //前台广播接收器,在运行超过10s将放弃执行 mFgBroadcastQueue = new BroadcastQueue(this, mHandler, "foreground", BROADCAST_FG_TIMEOUT, false); //后台广播接收器,在运行超过60s将放弃执行 mBgBroadcastQueue = new BroadcastQueue(this, mHandler, "background", BROADCAST_BG_TIMEOUT, true); mBroadcastQueues[0] = mFgBroadcastQueue; mBroadcastQueues[1] = mBgBroadcastQueue; //创建ActiveServices,其中非低内存手机mMaxStartingBackground为8 mServices = new ActiveServices(this); mProviderMap = new ProviderMap(this); //创建目录/data/system File dataDir = Environment.getDataDirectory(); File systemDir = new File(dataDir, "system"); systemDir.mkdirs(); //创建服务BatteryStatsService mBatteryStatsService = new BatteryStatsService(systemDir, mHandler); mBatteryStatsService.getActiveStatistics().readLocked(); ... //创建进程统计服务,信息保存在目录/data/system/procstats, mProcessStats = new ProcessStatsService(this, new File(systemDir, "procstats")); mAppOpsService = new AppOpsService(new File(systemDir, "appops.xml"), mHandler); mGrantFile = new AtomicFile(new File(systemDir, "urigrants.xml")); // User 0是第一个,也是唯一的一个开机过程中运行的用户 mStartedUsers.put(UserHandle.USER_OWNER, new UserState(UserHandle.OWNER, true)); mUserLru.add(UserHandle.USER_OWNER); updateStartedUserArrayLocked(); ... //CPU使用情况的追踪器执行初始化 mProcessCpuTracker.init(); ... mRecentTasks = new RecentTasks(this); // 创建ActivityStackSupervisor对象 mStackSupervisor = new ActivityStackSupervisor(this, mRecentTasks); mTaskPersister = new TaskPersister(systemDir, mStackSupervisor, mRecentTasks); //创建名为"CpuTracker"的线程 mProcessCpuThread = new Thread("CpuTracker") { public void run() { while (true) { synchronized(this) { final long now = SystemClock.uptimeMillis(); long nextCpuDelay = (mLastCpuTime.get()+MONITOR_CPU_MAX_TIME)-now; long nextWriteDelay = (mLastWriteTime+BATTERY_STATS_TIME)-now; if (nextWriteDelay < nextCpuDelay) { nextCpuDelay = nextWriteDelay; } if (nextCpuDelay > 0) { mProcessCpuMutexFree.set(true); this.wait(nextCpuDelay); } } updateCpuStatsNow(); //更新CPU状态 } } }; ... }
该过程共创建了3个线程,分别为”ActivityManager”,”android.ui”,”CpuTracker”。
2.1.3 AMS.start
1
2
3
4
5
6
7
8
9
private void start() { Process.removeAllProcessGroups(); //移除所有的进程组 mProcessCpuThread.start(); //启动CpuTracker线程 mBatteryStatsService.publish(mContext); //启动电池统计服务 mAppOpsService.publish(mContext); //创建LocalService,并添加到LocalServices LocalServices.addService(ActivityManagerInternal.class, new LocalService()); }
2.3 AMS.setSystemProcess
1
2
3
4
5
6
7
8
9
10
11
12
13
14
15
16
17
18
19
20
21
22
23
24
25
26
27
28
29
30
31
32
33
34
public void setSystemProcess() { try { ServiceManager.addService(Context.ACTIVITY_SERVICE, this, true); ServiceManager.addService(ProcessStats.SERVICE_NAME, mProcessStats); ServiceManager.addService("meminfo", new MemBinder(this)); ServiceManager.addService("gfxinfo", new GraphicsBinder(this)); ServiceManager.addService("dbinfo", new DbBinder(this)); if (MONITOR_CPU_USAGE) { ServiceManager.addService("cpuinfo", new CpuBinder(this)); } ServiceManager.addService("permission", new PermissionController(this)); ServiceManager.addService("processinfo", new ProcessInfoService(this)); ApplicationInfo info = mContext.getPackageManager().getApplicationInfo( "android", STOCK_PM_FLAGS); //【见小节2.3.1】 mSystemThread.installSystemApplicationInfo(info, getClass().getClassLoader()); synchronized (this) { //创建ProcessRecord对象 ProcessRecord app = newProcessRecordLocked(info, info.processName, false, 0); app.persistent = true; //设置为persistent进程 app.pid = MY_PID; app.maxAdj = ProcessList.SYSTEM_ADJ; app.makeActive(mSystemThread.getApplicationThread(), mProcessStats); synchronized (mPidsSelfLocked) { mPidsSelfLocked.put(app.pid, app); } updateLruProcessLocked(app, false, null);//维护进程lru updateOomAdjLocked(); //更新adj } } catch (PackageManager.NameNotFoundException e) { throw new RuntimeException("", e); } }
该方法主要工作是注册各种服务。
1
2
3
4
5
6
public void installSystemApplicationInfo(ApplicationInfo info, ClassLoader classLoader) { synchronized (this) { getSystemContext().installSystemApplicationInfo(info, classLoader); mProfiler = new Profiler(); //创建用于性能统计的Profiler对象 } }
该方法调用ContextImpl的nstallSystemApplicationInfo()方法,最终调用LoadedApk的installSystemApplicationInfo,加载名为“android”的package
2.3.2 installSystemApplicationInfo
1
2
3
4
5
void installSystemApplicationInfo(ApplicationInfo info, ClassLoader classLoader) { assert info.packageName.equals("android"); mApplicationInfo = info; //将包名为"android"的应用信息保存到mApplicationInfo mClassLoader = classLoader; }
2.4 startOtherServices
1
2
3
4
5
6
7
8
9
10
11
12
13
14
15
16
17
18
19
20
21
22
23
24
25
private void startOtherServices() { ... //安装系统Provider 【见小节2.4.1】 mActivityManagerService.installSystemProviders(); ... //phase480 && 500 mSystemServiceManager.startBootPhase(SystemService.PHASE_LOCK_SETTINGS_READY); mSystemServiceManager.startBootPhase(SystemService.PHASE_SYSTEM_SERVICES_READY); ... //【见小节3.1】 mActivityManagerService.systemReady(new Runnable() { public void run() { //phase550 mSystemServiceManager.startBootPhase( SystemService.PHASE_ACTIVITY_MANAGER_READY); ... //phase600 mSystemServiceManager.startBootPhase( SystemService.PHASE_THIRD_PARTY_APPS_CAN_START); ... } } }
2.4.1 AMS.installSystemProviders
1
2
3
4
5
6
7
8
9
10
11
12
13
14
15
16
17
18
19
20
21
22
23
public final void installSystemProviders() { List<ProviderInfo> providers; synchronized (this) { ProcessRecord app = mProcessNames.get("system", Process.SYSTEM_UID); providers = generateApplicationProvidersLocked(app); if (providers != null) { for (int i=providers.size()-1; i>=0; i--) { ProviderInfo pi = (ProviderInfo)providers.get(i); //移除非系统的provider if ((pi.applicationInfo.flags&ApplicationInfo.FLAG_SYSTEM) == 0) { providers.remove(i); } } } } if (providers != null) { //安装所有的系统provider mSystemThread.installSystemProviders(providers); } // 创建核心Settings Observer,用于监控Settings的改变。 mCoreSettingsObserver = new CoreSettingsObserver(this); }
AMS 启动服务完成,并且将SystemServer纳入AMS管理体系,接下来主要看AMS如何通讯管理activity
三. createSystemContext 1 2 3 4 5 6 7 8 9 10 private void createSystemContext() { //调用ActivityThread的systemMain函数,其中会创建出系统对应的Context对象 ActivityThread activityThread = ActivityThread.systemMain(); //取出上面函数创建的Context对象,保存在mSystemContext中 mSystemContext = activityThread.getSystemContext(); //设置系统主题 mSystemContext.setTheme(DEFAULT_SYSTEM_THEME); }
在启动ams之前,系统调用了createSystemContext 创建了ActivityThread(app启动入口),配置了mSystemContext
1 2 3 4 5 6 7 8 9 10 11 12 13 14 15 16 17 18 19 20 21 22 23 24 25 26 27 28 29 30 31 32 33 34 35 36 37 38 39 40 41 42 43 44 45 46 47 48 [系统app] public static ActivityThread systemMain() { // The system process on low-memory devices do not get to use hardware // accelerated drawing, since this can add too much overhead to the // process. if (!ActivityManager.isHighEndGfx()) { //虽然写着ActivityManager,但和AMS没有任何关系 //就是利用系统属性和配置信息进行判断 //关闭硬件渲染功能 ThreadedRenderer.disable(true); } else { ThreadedRenderer.enableForegroundTrimming(); } //创建ActivityThread ActivityThread thread = new ActivityThread(); //调用attach函数,参数为true thread.attach(true); return thread; } [普通app] public static void main(String[] args) { ...ignore some code... Looper.prepareMainLooper(); ActivityThread thread = new ActivityThread(); thread.attach(false); if (sMainThreadHandler == null) { sMainThreadHandler = thread.getHandler(); } AsyncTask.init(); if (false) { Looper.myLooper().setMessageLogging(new LogPrinter(Log.DEBUG, "ActivityThread")); } Looper.loop(); ...ignore some code... }
最总进入attach
1 2 3 4 5 6 7 8 9 10 11 12 13 14 15 16 17 18 19 20 21 22 23 24 25 26 27 28 29 30 31 32 33 34 35 36 37 38 39 40 41 42 43 44 45 46 47 48 49 50 51 //此时,我们传入的参数为true,表示该ActivityThread是系统进程的ActivityThread private void attach(boolean system) { //创建出的ActivityThread保存在类的静态变量sCurrentActivityThread //AMS中的大量操作将会依赖于这个ActivityThread sCurrentActivityThread = this; mSystemThread = system; if (!system) { ...ignore some code... RuntimeInit.setApplicationObject(mAppThread.asBinder()); final IActivityManager mgr = ActivityManagerNative.getDefault(); try { mgr.attachApplication(mAppThread); } catch (RemoteException ex) { // Ignore } } else { //系统进程的处理流程,该情况只在SystemServer中处理 // Don't set application object here -- if the system crashes, // we can't display an alert, we just want to die die die. //设置DDMS(Dalvik Debug Monitor Service)中看到的SystemServer进程的名称为“system_process” android.ddm.DdmHandleAppName.setAppName("system_process", UserHandle.myUserId()); try { //创建ActivityThread中的重要成员:Instrumentation、Application和Context mInstrumentation = new Instrumentation(); ContextImpl context = ContextImpl.createAppContext( this, getSystemContext().mPackageInfo); mInitialApplication = context.mPackageInfo.makeApplication(true, null); mInitialApplication.onCreate(); } catch (Exception e) { throw new RuntimeException( "Unable to instantiate Application():" + e.toString(), e); } } //以下系统进程和非系统进程均会执行 ................ //注册Configuration变化的回调通知 ViewRootImpl.addConfigCallback(new ComponentCallbacks2() { @Override public void onConfigurationChanged(Configuration newConfig) { //当系统配置发生变化时(例如系统语言发生变化),回调该接口 ............... } ............. }); }
启动流程:
1 2 3 4 5 6 attach attachApplication attachApplicationLocked bindApplication makeApplication
来看下bindApplication
1 2 3 4 5 6 7 8 9 10 11 12 13 14 15 16 17 18 19 20 21 22 23 24 25 26 27 28 29 30 31 32 33 private class ApplicationThread extends ApplicationThreadNative { public final void bindApplication(String processName, ApplicationInfo appInfo, List<ProviderInfo> providers, ComponentName instrumentationName, ProfilerInfo profilerInfo, Bundle instrumentationArgs, IInstrumentationWatcher instrumentationWatcher, IUiAutomationConnection instrumentationUiConnection, int debugMode, boolean enableOpenGlTrace, boolean isRestrictedBackupMode, boolean persistent, Configuration config, CompatibilityInfo compatInfo, Map<String, IBinder> services, Bundle coreSettings) { ...ignore some code... AppBindData data = new AppBindData(); data.processName = processName; data.appInfo = appInfo; data.providers = providers; data.instrumentationName = instrumentationName; data.instrumentationArgs = instrumentationArgs; data.instrumentationWatcher = instrumentationWatcher; data.instrumentationUiAutomationConnection = instrumentationUiConnection; data.debugMode = debugMode; data.enableOpenGlTrace = enableOpenGlTrace; data.restrictedBackupMode = isRestrictedBackupMode; data.persistent = persistent; data.config = config; data.compatInfo = compatInfo; data.initProfilerInfo = profilerInfo; sendMessage(H.BIND_APPLICATION, data); } }
我们需要关注的其实就是最后的sendMessage(),里面有函数的编号H.BIND_APPLICATION,然后这个Messge会被H这个Handler处理
1 2 3 4 5 6 7 8 9 10 11 12 13 14 15 16 17 18 19 20 private class H extends Handler { ...ignore some code... public static final int BIND_APPLICATION = 110; ...ignore some code... public void handleMessage(Message msg) { switch (msg.what) { ...ignore some code... case BIND_APPLICATION: Trace.traceBegin(Trace.TRACE_TAG_ACTIVITY_MANAGER, "bindApplication"); AppBindData data = (AppBindData)msg.obj; handleBindApplication(data); Trace.traceEnd(Trace.TRACE_TAG_ACTIVITY_MANAGER); break; ...ignore some code... } }
最后就在下面这个方法中,完成了实例化,拨那个企鹅通过mInstrumentation.callApplicationOnCreate实现了onCreate()的调用。
1 2 3 4 5 6 7 8 9 10 11 12 13 14 15 16 17 18 19 20 21 22 23 private void handleBindApplication(AppBindData data) { try { ...ignore some code... Application app = data.info.makeApplication(data.restrictedBackupMode, null); mInitialApplication = app; ...ignore some code... try { mInstrumentation.onCreate(data.instrumentationArgs); } catch (Exception e) { } try { mInstrumentation.callApplicationOnCreate(app); } catch (Exception e) { } } finally { StrictMode.setThreadPolicy(savedPolicy); } }
data.info是一个LoadeApk对象。
LoadeApk.data.info.makeApplication()
1 2 3 4 5 6 7 8 9 10 11 12 13 14 15 16 17 18 19 20 21 22 23 24 25 26 27 28 29 30 31 32 33 34 35 36 37 38 39 40 public Application makeApplication(boolean forceDefaultAppClass, Instrumentation instrumentation) { if (mApplication != null) { return mApplication; } Application app = null; String appClass = mApplicationInfo.className; if (forceDefaultAppClass || (appClass == null)) { appClass = "android.app.Application"; } try { java.lang.ClassLoader cl = getClassLoader(); if (!mPackageName.equals("android")) { initializeJavaContextClassLoader(); } ContextImpl appContext = ContextImpl.createAppContext(mActivityThread, this); app = mActivityThread.mInstrumentation.newApplication( cl, appClass, appContext); appContext.setOuterContext(app); } catch (Exception e) { } mActivityThread.mAllApplications.add(app); mApplication = app; //传进来的是null,所以这里不会执行,onCreate在上一层执行 if (instrumentation != null) { try { instrumentation.callApplicationOnCreate(app); } catch (Exception e) { } } ...ignore some code... } return app; }
所以最后还是通过Instrumentation.makeApplication()实例化的
1 2 3 4 5 6 7 static public Application newApplication(Class<?> clazz, Context context) throws InstantiationException, IllegalAccessException, ClassNotFoundException { Application app = (Application)clazz.newInstance(); app.attach(context); return app; }
四. 从luanch app 出发看ams 1 2 3 4 5 6 7 8 9 10 11 12 13 14 15 16 17 18 19 20 21 22 23 24 25 26 27 28 29 30 31 32 /** * Launches the intent referred by the clicked shortcut */ public void onClick(View v) { ...ignore some code... Object tag = v.getTag(); if (tag instanceof ShortcutInfo) { // Open shortcut final Intent intent = ((ShortcutInfo) tag).intent; int[] pos = new int[2]; v.getLocationOnScreen(pos); intent.setSourceBounds(new Rect(pos[0], pos[1], pos[0] + v.getWidth(), pos[1] + v.getHeight())); //开始开启Activity咯~ boolean success = startActivitySafely(v, intent, tag); if (success && v instanceof BubbleTextView) { mWaitingForResume = (BubbleTextView) v; mWaitingForResume.setStayPressed(true); } } else if (tag instanceof FolderInfo) { //如果点击的是图标文件夹,就打开文件夹 if (v instanceof FolderIcon) { FolderIcon fi = (FolderIcon) v; handleFolderClick(fi); } } else if (v == mAllAppsButton) { ...ignore some code... } }
我们知道桌面引用就是lancher app .当用户点击后触发onclick事件,启动startActvitySafely,也就是startActivity
1 2 3 4 5 6 7 8 9 10 @Override public void startActivity(Intent intent, @Nullable Bundle options) { if (options != null) { startActivityForResult(intent, -1, options); } else { // Note we want to go through this call for compatibility with // applications that may have overridden the method. startActivityForResult(intent, -1); } }
每个Activity都持有Instrumentation对象的一个引用,但是整个进程只会存在一个Instrumentation对象。当startActivityForResult()调用之后,实际上还是调用了mInstrumentation.execStartActivity()
1 2 3 4 5 6 7 8 9 10 11 12 13 14 15 16 17 18 19 20 21 22 public void startActivityForResult(Intent intent, int requestCode, @Nullable Bundle options) { if (mParent == null) { Instrumentation.ActivityResult ar = mInstrumentation.execStartActivity( this, mMainThread.getApplicationThread(), mToken, this, intent, requestCode, options); if (ar != null) { mMainThread.sendActivityResult( mToken, mEmbeddedID, requestCode, ar.getResultCode(), ar.getResultData()); } ...ignore some code... } else { if (options != null) { //当现在的Activity有父Activity的时候会调用,但是在startActivityFromChild()内部实际还是调用的mInstrumentation.execStartActivity() mParent.startActivityFromChild(this, intent, requestCode, options); } else { mParent.startActivityFromChild(this, intent, requestCode); } } ...ignore some code... }
下面是mInstrumentation.execStartActivity()的实现
1 2 3 4 5 6 7 8 9 10 11 12 13 14 15 16 17 18 public ActivityResult execStartActivity( Context who, IBinder contextThread, IBinder token, Activity target, Intent intent, int requestCode, Bundle options) { IApplicationThread whoThread = (IApplicationThread) contextThread; ...ignore some code... try { intent.migrateExtraStreamToClipData(); intent.prepareToLeaveProcess(); int result = ActivityManagerNative.getDefault() .startActivity(whoThread, who.getBasePackageName(), intent, intent.resolveTypeIfNeeded(who.getContentResolver()), token, target != null ? target.mEmbeddedID : null, requestCode, 0, null, options); checkStartActivityResult(result, intent); } catch (RemoteException e) { } return null; }
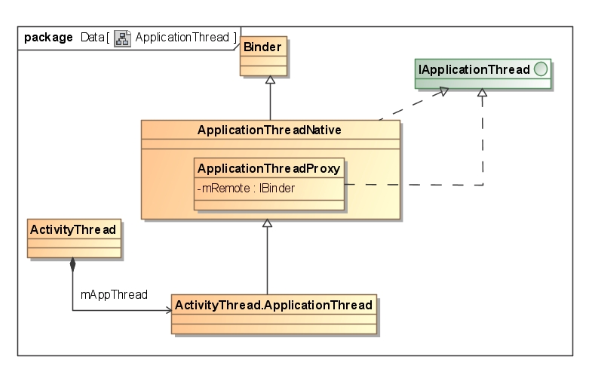
客户端:ActivityManagerProxy =====>Binder驱动=====> ActivityManagerService:服务器
五. AMS接收到客户端的请求之后,会如何开启一个Activity? 1 2 3 4 5 6 startActivity startActivityAsUser startActivityMayWait startActivityLocked startActivityUncheckedLocked startActivityLocked
1 2 3 4 5 6 7 8 9 10 11 12 13 14 15 16 17 18 19 20 21 22 23 24 25 26 27 28 29 30 31 32 33 34 35 36 37 38 39 40 41 42 43 44 45 46 47 48 49 50 51 52 53 54 55 final void startActivityLocked(ActivityRecord r, boolean newTask, boolean doResume, boolean keepCurTransition, Bundle options) { //ActivityRecord中存储的TaskRecord信息 TaskRecord rTask = r.task; ...ignore some code... //如果不是在新的ActivityTask(也就是TaskRecord)中的话,就找出要运行在的TaskRecord对象 TaskRecord task = null; if (!newTask) { boolean startIt = true; for (int taskNdx = mTaskHistory.size() - 1; taskNdx >= 0; --taskNdx) { task = mTaskHistory.get(taskNdx); if (task.getTopActivity() == null) { // task中的所有Activity都结束了 continue; } if (task == r.task) { // 找到了 if (!startIt) { task.addActivityToTop(r); r.putInHistory(); mWindowManager.addAppToken(task.mActivities.indexOf(r), r.appToken, r.task.taskId, mStackId, r.info.screenOrientation, r.fullscreen, (r.info.flags & ActivityInfo.FLAG_SHOW_ON_LOCK_SCREEN) != 0, r.userId, r.info.configChanges, task.voiceSession != null, r.mLaunchTaskBehind); if (VALIDATE_TOKENS) { validateAppTokensLocked(); } ActivityOptions.abort(options); return; } break; } else if (task.numFullscreen > 0) { startIt = false; } } } ...ignore some code... // Place a new activity at top of stack, so it is next to interact // with the user. task = r.task; task.addActivityToTop(r); task.setFrontOfTask(); ...ignore some code... if (doResume) { mStackSupervisor.resumeTopActivitiesLocked(this, r, options); } }
1 2 3 4 5 6 7 8 9 10 11 12 13 14 15 boolean resumeTopActivitiesLocked(ActivityStack targetStack, ActivityRecord target, Bundle targetOptions) { if (targetStack == null) { targetStack = getFocusedStack(); } // Do targetStack first. boolean result = false; if (isFrontStack(targetStack)) { result = targetStack.resumeTopActivityLocked(target, targetOptions); } ...ignore some code... return result; }
1 2 3 4 5 6 7 8 9 10 11 12 13 14 15 16 final boolean resumeTopActivityLocked(ActivityRecord prev, Bundle options) { if (inResumeTopActivity) { // Don't even start recursing. return false; } boolean result = false; try { // Protect against recursion. inResumeTopActivity = true; result = resumeTopActivityInnerLocked(prev, options); } finally { inResumeTopActivity = false; } return result; }
1 2 3 4 5 6 7 8 9 10 11 12 13 14 15 16 17 18 19 20 21 22 23 24 25 final boolean resumeTopActivityInnerLocked(ActivityRecord prev, Bundle options) { ...ignore some code... //找出还没结束的首个ActivityRecord ActivityRecord next = topRunningActivityLocked(null); //如果一个没结束的Activity都没有,就开启Launcher程序 if (next == null) { ActivityOptions.abort(options); if (DEBUG_STATES) Slog.d(TAG, "resumeTopActivityLocked: No more activities go home"); if (DEBUG_STACK) mStackSupervisor.validateTopActivitiesLocked(); // Only resume home if on home display final int returnTaskType = prevTask == null || !prevTask.isOverHomeStack() ? HOME_ACTIVITY_TYPE : prevTask.getTaskToReturnTo(); return isOnHomeDisplay() && mStackSupervisor.resumeHomeStackTask(returnTaskType, prev); } //先需要暂停当前的Activity。因为我们是在Lancher中启动mainActivity,所以当前mResumedActivity!=null,调用startPausingLocked()使得Launcher进入Pausing状态 if (mResumedActivity != null) { pausing |= startPausingLocked(userLeaving, false, true, dontWaitForPause); if (DEBUG_STATES) Slog.d(TAG, "resumeTopActivityLocked: Pausing " + mResumedActivity); } }
1 2 3 4 5 6 7 8 9 10 11 12 13 14 15 16 17 18 19 20 21 22 23 24 25 26 27 final boolean startPausingLocked(boolean userLeaving, boolean uiSleeping, boolean resuming, boolean dontWait) { if (mPausingActivity != null) { completePauseLocked(false); } ...ignore some code... if (prev.app != null && prev.app.thread != null) try { mService.updateUsageStats(prev, false); prev.app.thread.schedulePauseActivity(prev.appToken, prev.finishing, userLeaving, prev.configChangeFlags, dontWait); } catch (Exception e) { mPausingActivity = null; mLastPausedActivity = null; mLastNoHistoryActivity = null; } } else { mPausingActivity = null; mLastPausedActivity = null; mLastNoHistoryActivity = null; } ...ignore some code... }
在Lancher进程中消息传递,调用ActivityThread.handlePauseActivity(),最终调用ActivityThread.performPauseActivity()暂停指定Activity。接着通
过前面所说的Binder通信,通知AMS已经完成暂停的操作。
总结:
ams启动时候启动mHandlerThread,ui,CpuTracker 线程
ams启动前还启动了 ActivityThread 。系统app attach(True),非系统app attach(False)。true代表直接通过Instrumentation makeApplication初始化引用程序。false 代表将app 通过ActivityManagerProxy 发到bind。ActivityManagerService 接受到bind信息后makeApplication初始化app(bind有认证)。最后Instrumentation.onCreate,启动app
从luanch app 出发看ams.监听桌面的图标,调用startActivity。ActivityManagerProxy startActivity,最后到startActivityLocked中暂停ActivityTask top层的activity,resume点击的app